

[Title]
[text TOC]
[image TOC]
[Site Search]
 [Donation]
 |
Dream Catcher |
 |
| Materials |
Tools |
2 1/2" Ring of heavy wire
10' leather lacing
10' string
Beads, feathers, charms/conchos...
PVC ring |
White Glue
Scissors |
See the String Chapter for more instructions, hints, tips, and ideas.
Dream catchers originated with the Ojibwe or Chippewa tribe of Native American Indians. The purpose of a dream catcher was to catch and hold bad dreams but allow good dreams to pass through. They work much as a spider's web catches and hold insects. They were placed above the beds (especially of infants) where the first light of morning will fall on them. The light destroys the bad dreams. A feather is sometimes tied to the center of the web to remind one of the importance of air. A bead in the web represents the spider. The hole in the center of the web is where the good dreams pass through.
Depending on the diameter of your ring and the size of wire it is made of you may need more lacing.
- Tie leather lacing to bottom of ring with an overhand knot leaving about 8" of extra lacing. The knot is only meant to temporarily hold the lacing in place.
- Wrap the lacing tightly around the ring halfway until you get to the top. Loops should be close together.
- Put the PVC ring next to the wire ring and run several loops of lacing around the wire loop and through the PVC ring.
- Continue wrapping the lacing tightly around the wire ring until you get back to the starting point at the bottom.
- Untie the overhand knot. Adjust the two ends by unwrapping one and wrapping the other until they are centered below the PVC ring. Then tie the two ends together in an overhand knot. Put a drop of white glue on the knot to lock it.
- Tie one end of the string onto the ring between loops of the leather lacing. Put a drop of glue on the knot to lock it.
- See the photo above. You are going to make a series of loops around the ring. They should be made about the same size and shape. You can use something to help measure the size (maybe your finger or thumb). Make a small loop of string and tie it to the ring between loops of lacing as shown in the drawing below.
- Continue until you have made loops all around the wire ring.
- Next make the interior loops. Run the string through the next loop and tie it as shown in the drawing above. It should be near the middle of the loop. You want to pull the outside loops tight.
- Continue in this manner until you are near the middle. The loops should get smaller as you go.
- Slide a special bead onto the string to represent the spider.
- Continue until you get to the middle of the web. Then tie the string using a couple of overhand knots. Put a drop of glue on the knot to lock it. Cut off excess string.
- Now decorate the lacing. Slide on any decorative beads that you want. Tie a stopper knot like an overhand knot, a Figure 8 knot (see Double Figure 8 and tie using only a single strand of lacing), or the stopper described on Bowline with Stopper. Cut the ends of the lacing the same length. Glue a small feather to the ends of the lacing.

Variations
These are not really dream catchers, but some of the techniques for making them are the same, so I have included them here.
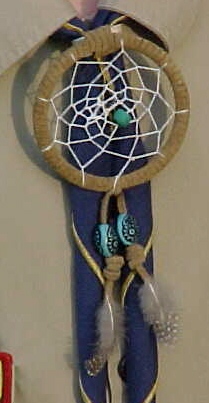
The design on the left uses about 25 feet of string.
- Putting the leather lacing on the wire ring is similar to that described in steps 1 through 5 above, but in this case, the PVC ring is attached last and the knot that ties the ends of the leather lacing is inside the PVC ring.
- Tie the string to the ring between the loops of lacing at the top (near the ring at 12 o'clock). Leave about 6 inches of extra string.
- Wrap to around the 5 o'clock position.
- Loop back up to the top to the next loop of lacing to the left (counter-clockwise).
- Loop back down to near the 5 o'clock position to the loop above your previous wrap.
- Continue in this manner until you get to the point where you originally tied the string onto the wire loop.
- Tie the end to the beginning string using a square knot. Put a drop of glue on the knot to lock it. Cut off excess string.
- Using fine thread tie the charms to the string.
- Tie three threads about 12 inches long to the bottom of the ring. They should be evenly space.
- Slide the beads onto the thread in the order desired. The beads in the photo are red agate, black onyx, blue turquoise, silver, and bone. A metal feather decorates the end of each strand.
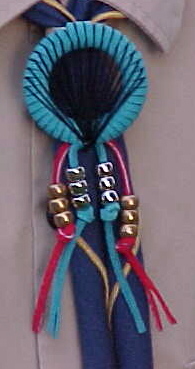
For the design on the right, the ring is only about 1 1/2" in diameter.
- Put the leather lacing and PVC ring on the wire ring as described in steps 1 through 5 above.
- In the knot that ties the two ends of the lacing together, add an extra piece of lacing about 12" long.
- Tie the piece of string to the very bottom of the wire ring (opposite the PVC ring). Leave about 6 inches of extra string.
- Wrap the lacing to about the 3 o'clock position and then back to the bottom.
- Wrap the lacing to about the 9 o'clock position and then back to the bottom.
- Continue wrapping to the right then the left. Each wrap should go into the leather lacing loops closer to the top than the previous wrap.
- When all wraps are finished, tie the end to the beginning string using a square knot. Put a drop of glue on the knot to lock it. Cut off excess string. Put some glue on the string near the bottom to keep it from sliding off.
- Slide beads onto the pieces of lacing.
- Tie a stopper knot like an overhand knot, a Figure 8 knot (see Double Figure 8 and tie using only a single strand of lacing), or the stopper described on Bowline with Stopper. Cut the ends of the lacing the same length. You could decorate the ends of the lacing with a feather if desired.
Copyright © 2003 Vincent Hale