

[Title]
[text TOC]
[image TOC]
[Site Search]
 [Donation]
 |
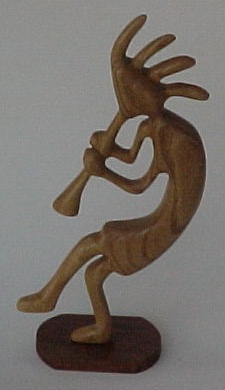
Kokopelli |
 |
| Materials |
Tools |
3" x 1.5" x 1/4" wood
PVC Ring |
Knife
Sandpaper
Clear finish |
See the Wood Carving section for more instructions, hints, and tips.
Kokopelli is a Native American symbol that is found in pre-historic pictographs. He is often depicted as a humpback flute player. He is a roving minstrel and a trickster. To learn more about the meaning and history of Kokopelli see Wikipedia.
This is an easy one if you have access to a scroll saw and can cut them out. If you have to do all the work with hand tools it's a bit more challenging. It has more of a two dimensional look than three. It does require a lot of sanding.
- Copy the clip art and enlarge it to the size you want. Three inches is a nice size for a neckerchief slide. Make it larger for a free standing decoration.
- Cut out the copy and paste it on a piece of thin wood. Use 1/4" for a small one, and thicker for a larger one - it's really up to what you want. Using a wood with a nice grain pattern like butternut or catalpa will give it more character.
- Cut out the rough out.
- This is an easy project except that it is very delicate. Take care not to press too hard on the legs, flute, or feathers.
- Draw a center line both inside and outside all the way around the shape.
- Decide which arm you want to be the right and which the left and which leg is right and left. I don't think it makes any difference. If you remove wood from both sides of the legs, they will both end up in the middle. That's why you remove wood from only one side.
- Remove about half the width of the legs to make them right and left.
- Do the same for the arms. Leave the hands alone for right now.
- Start rounding the corners. I like to start at the feet and work up.
- When you get to the flute, be sure to put the flute in the middle. Draw the shape of the flute on the wood. Rough out the flute.
- Rough out the hands. The right hand will be open on the left side of the flute and the left hand open on the right.
- When you get to the head, thin the feathers on both sides (so they are in the middle). Be very careful not to break them off.
- Round the head last.
- Finish the hands. You can put in the fingers if you want or just leave them looking like mittens.
- Now sand the whole thing. This may take a while because there are a lot of curves. You might find it helpful to wrap the sandpaper around a dowel rod to get into some of the tight places.
- Stain it if you want and put on several coats of clear finish like Deft satin spray to protect it.
If a piece breaks off put it back on using super glue or wood glue.
Attach a PVC ring to one of the sides with E-6000™ to make a neckerchief slide.
If you want, leave a peg on the bottom foot (or add a dowel at the end) to mount it on a stand.

Copyright © 2006 Vincent Hale