

[Title]
[text TOC]
[image TOC]
[Site Search]
 [Donation]
 |
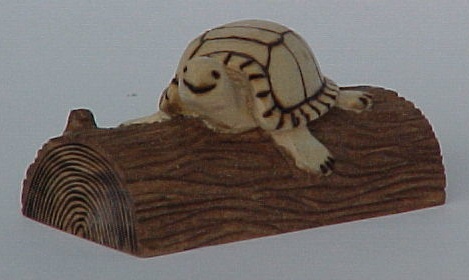
Turtle on a Log |
 |
| Materials |
Tools |
Basswood 1 1/4" x 1 1/4" x 2 3/4"
|
Saw
Knife
V Tool
Pencil
Ruler
Wood burner
Sandpaper
Clear varnish
Stain
Sealer |
See the Wood Carving section for more instructions, hints, and tips.
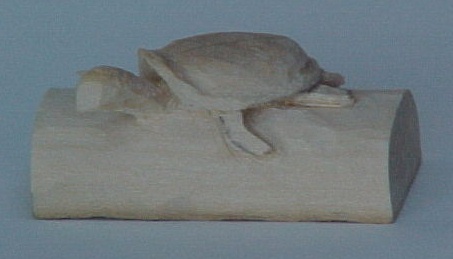
This is a really cute project that's fun and not as difficult as it may look. You will need a V tool and a wood burner with a fine tip. Plan on it taking about five hours.
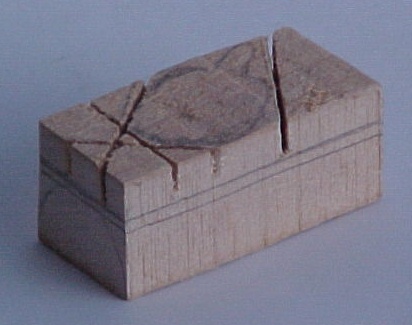
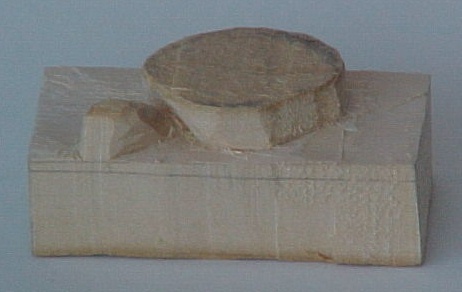
- Layout the top and sides of the block as indicated. The lines on the sides are 1/4", 5/8", and 9/16" from the bottom.
Top, Side, and End
- Make the straight cuts in the top down to the top line on the sides with a handsaw. These make it easier to remove the top wood.
- Remove the wood to the top line with a knife.
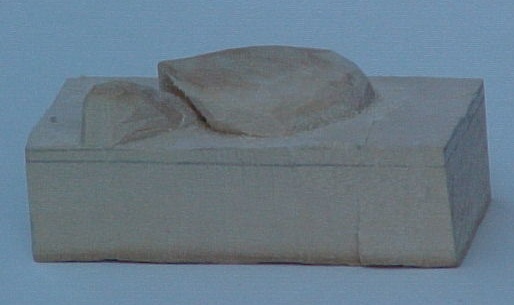
- Clean up the turtle shape with knife cuts straight down along the line around the shell, neck, and head.
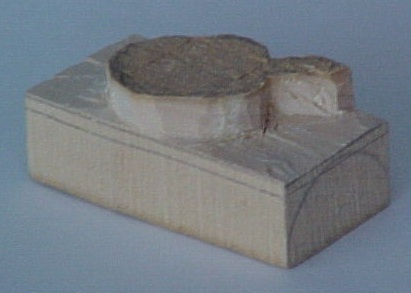
- Remove wood to form the slope of the neck and hollow out under the shell forming an arch over the neck.
- Curve the corners of the shell from the base to the arch around the neck.
- Round the shell by removing wood at a 45 degree angle. Then make cuts above and below this 45 degree cut to blend it with the horizontal top of the shell and the vertical sides of the shell. Check the shell for symmetry making any corrections as necessary.
- Draw a line around the very base of the shell. Under cut the shell along this line at a slight angle from horizontal. Later when you remove wood for the log this undercut will form the bottom of the shell. You want the bottom of the shell to be slightly rounded convex not flat or sunken.
- The edges of the shell turn up slightly all the way around. Form this by either using a gouge (1/4" #9) or removing it with a knife. This will reduce the diameter of the shell.
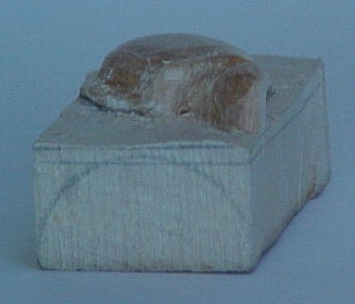
- Now you have to re-round the shell because the base is smaller. Make sure it is symmetric.
- If you want to leave a stump of a branch or a knot on your log, draw it in now and put stop cuts around it using a gouge or a knife.
- Now start to work on the log. Remove wood to the lower line (not the bottom) to form a half circle about 1/16" above the half circle line on the end. Later you will take this on down about 1/16" when you form the legs and tail. Don't take anything off from the head forward. Leave that until last so you don't break off the head. Be careful around any stump or branch so you don't cut them off.
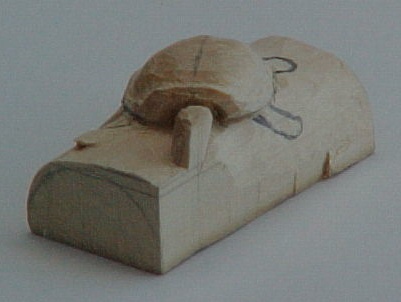
- Very lightly, draw a center line on the shell. Draw the tail (short and wide for female, longer and thinner for male).
- Draw the legs. The front legs should come out just behind the arch of the shell around the head. The back legs should be about 1/4" from the tail. Make all the legs about 1/4" wide. The front legs will be longer than the back. Put a slight bend in them to make them look more natural. Put stop cuts straight in around all the legs and tail.
- Remove wood around the legs and tail to define them to a depth of about 1/16". Then take the rest of the log on down to the arched line. This will require undercutting the shell. Round the log all the way to the bottom. Also, round the part of the log by the head and remove the wood under the head and neck.
- Form the neck and head. The neck should be thinner than the head. Make the head symmetric. The lower jaw is almost square.
- Sand the shell smooth. Carefully sand the head and neck. Clean up under the shell as best you can (a Marsh™ sander comes in handy). Don't worry about sanding the log itself.
- Now for the bark on the log. Use a V tool. The secret is to make it look random. If you make it all the same it will look like hair. Work from both ends. Make a cut, turn the log over and make another cut, turn it over, ... The key is variety. Make some cuts wavy, some straight, some deep and wide, some narrow and shallow, some long and some short. The cuts can meet in a Y but shouldn't cross. Run the cuts right up to the turtle to make it look like they go under the legs, tail, ... You will probably have to clean these out with a knife. Make the cuts curve around any limbs or knots. After you have gone over the whole log, go back over it and add lines to fill any spots that look empty.
- On the two ends of the log, remove the saw marks with a knife and sand the ends smooth. This keeps them from staining too dark.
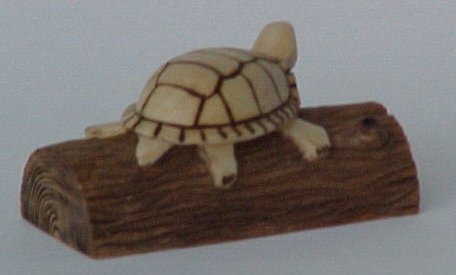
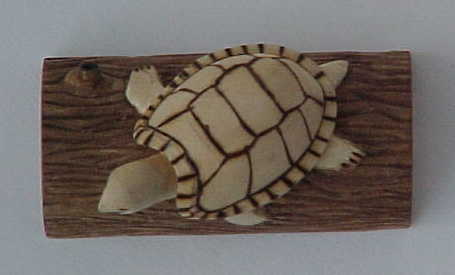
- Lay out the lines on the turtle's shell. They are called scutes. Use the drawings below for reference. Symmetry is important. There should be 5 scutes down the middle (called vertebral scutes) and four on each side (called costal scutes) for a total of 13. Then there are a bunch around the edge (called marginal scutes). First draw a line around the perimeter of the shell for the marginal scutes. You don't have to draw the individual marginal scutes in. Then draw a centerline and four lines perpendicular to it for the vertebral scutes. The first and last of these lines should be shorter than the middle two. Mark the location of where you want the costal scutes to touch the marginal scutes. On the drawings below, look at the placement of these marks relative to where the line will touch the vertebral scutes. Also, draw in the eyes and mouth - be sure to give him a smile by turning up the corners! Now erase or sand off the centerline.

- Woodburn the line around the perimeter of the shell for the marginal scutes. Make the marginal scutes by burning lines around the perimeter that point to the center of the turtle's shell. Make them evenly spaced and don't make them too close. There should be a marginal scute line on the centerline by the head and tail.
- Woodburn the straight lines of the vertebral scutes. Next burn the sides of the middle three vertebral scutes. These kind of look like {, but you can approximate this with either ( or <.
- Now form the front and back vertebral scutes and the costal scutes. Try to make these lines a little wavy. It looks much better than straight lines. Use the drawings above for reference.
- Make 3 marks on the ends of each leg for toes. For the mouth, burn the tip where the two sides will meet in the center, then burn the sides. For the eyes, hold the wood burner at the same angle and orientation for both eyes. Burn out the center of the knots or branches. Burn your name and date in the bottom.
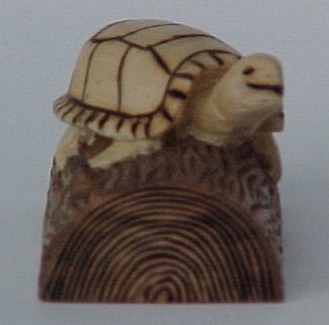
- Burn the rings on the ends of the log by starting at the outside nearest the bark. Use a low heat setting and go slowly. Make the rings as close together as you want. The rings should not touch or cross. You may want to practice this on a scrap piece of wood.
- You can put dots on the turtle's skin if you want.
- Use a small brush to paint all the turtle with water based satin finish varnish (available in craft stores). Be careful not to get any on the branch.
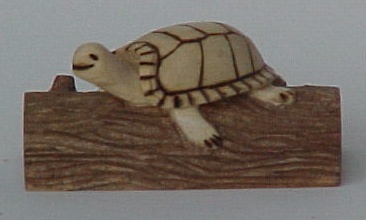
- Use a Q-tip and small brush to stain the log. The one in the photo used Minwax™ Water Based Colonial Pine Wood Stain (available in home repair stores). Use the brush under the turtle's shell and around the legs and tail. Don't forget the ends of the logs. If you get any on the turtle, quickly wipe it off with a wet Q-tip or rag.
- After it has dried completely, spray it all over with a sealer like Deft™ satin (available in home repair stores). A couple coats should be sufficient.
Thanks to Dean Walden for teaching me this cutie! If you want more of a challenge, put two or more turtles on the log. Dean has one with five!
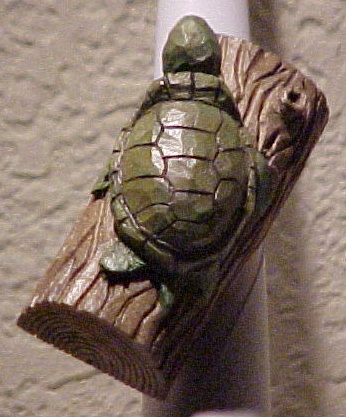
Since I first learned how to carve a turtle on a log, I've learned how to paint them more realistically. If you want a more natural look, do not apply varnish as instructed above.
Use green, brown, orange, and yellow paint, but you could actually use black, purple, red, or any other color you want.
Experiment on a scrap piece of wood.
Dilute the paint one drop of paint to several (3 or more) drops of water. There is nothing precise about this. Stir frequently as the pigments tend to separate.
I like to make the legs, head, and tail greener so they stand out more against the log. The shell is a bit browner than the legs but different from the log.
As you paint, just dab the brush, don't make strokes. Don't try to make the paint cover even, make it random more like nature. Here, splotchy and uneven is good.
Start with the color you want to dominate (green for the legs and brown for the shell). Mix it stronger, adding only one to three drops of water per drop of paint.
Apply the paint and let it dry. A hair dryer can help this process go faster.
Apply other colors in layers as desired. Dilute them with more drops of water than you used on your base color. Continue until you get the look you want.
Copyright © 2006 Vincent Hale