

[Title]
[text TOC]
[image TOC]
[Site Search]
 [Donation]
 |
Ceramics |
 |
| Materials |
Tools |
|
Clay
|
Kiln
Plastic table covers
Ceramic paint (glaze) and brushes
Plastic, wooden, or metal tools
Bowl and bucket of water
Rags
Ruler or straight edge
Rolling pin
Plastic zip lock bags
|
Something to think about as you make ceramics is that archaeologists have dug up pottery that is at least 26,000 years old. Could your piece of art be excavated several thousand years from now?
The first challenge you must overcome for this craft is to find a kiln. Colleges, some high schools, ceramics stores, and individuals are good places to try. Many businesses may not be willing to let you use their kiln because of the risk of the pieces exploding and ruining other customers' pieces.
Ceramics needs to be done in at least two sessions at least a week apart. In the first session, give introductory instructions and make the pieces. Over the week, the pieces will dry out and undergo their first firing. At the second meeting, the pieces are painted (glazed). Then they are fired again. A third firing may be needed to add a shiny finish.
Projects can be decorated with leather tooling stamps, carved with tools, impressed with rope or other textured surface, or add small coils or shapes of clay.
Here are some ideas meant for neckerchief slides. Let your imagination soar.
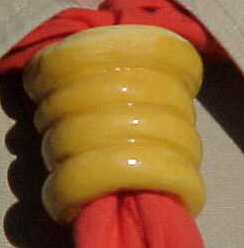
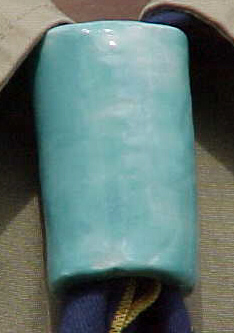
- Tube - This could be just a plain tube that has been glazed or add some special decorations. Some glazes give unusual results when fired.
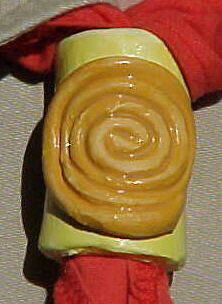
- Scroll - two tubes joined together.
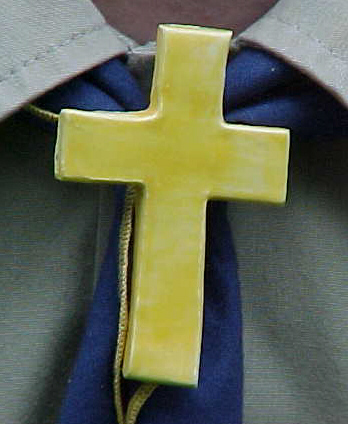
- Cross - Make from either coils or slabs.
- Fleur-de-lis - Decorate or put unit number inside.
- Arrow or Arrowhead - Decorate or put unit number and city.
- Face or mask - Make it funny or scary or maybe an animal.
- State outline
- Troop number or your name - Try this with either coils or a slab. With coils, make the characters first and allow them to dry some. Then turn them over, arrange them, and add bits of fresh clay to every place the characters touch to bond them together. To do this with a slab, carve the numbers from a single slab.
- 3 strand braid
- Foot
- Hatchet
- Totem pole
- Pretzel - The ends of the neckerchief go through the top two holes then together out the bottom hole.
- Slab with 3 holes - Use like pretzel above but add decorations.
- Thunderbird
- Knot - Keep it simple like a square or overhand.
- Steer skull
- Conchos - Use cookie cutters to make different shapes and decorate or add your troop number, city, organization, or name. Cut holes in the shapes using straws to add leather lacing and beads.
- Snake - coil it around a tube to help hold the right size.

Here are some ideas of other things to make.
- Coaster - Make a coil about three feet long and 1/4" in diameter. Shape it into a spiral. Add a larger diameter ring to the outside. Glaze the outer edge and bottom (making them waterproof), and leave the middle top (where glass sits) unglazed so that it absorbs the condensation.
- Flower pot - Make either a pinch or coil pot and put a drain hole in the bottom.
- Pencil holder - Make a coil pot that is tall and thin. You could also make one from a slab.
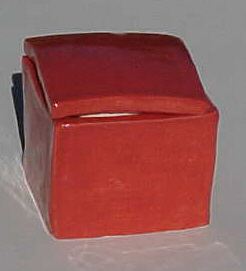
- Box - Make a large slab of clay. Cut out all of the sides, top, and bottom. Lay them flat on a surface and allow to dry, turning them every couple of hours so they don't curl up (the top will dry up quicker and shrink causing the edge to curl up). When they are leather dry, fit them together, slip and score them, then add coils of clay pressed into the corners to hold the sides together.
- Bowl - Be sure to use a glaze that is approved for food.
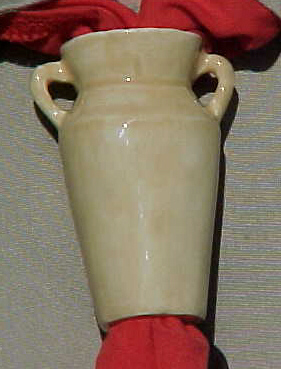
- Vase - Glaze both inside and out.
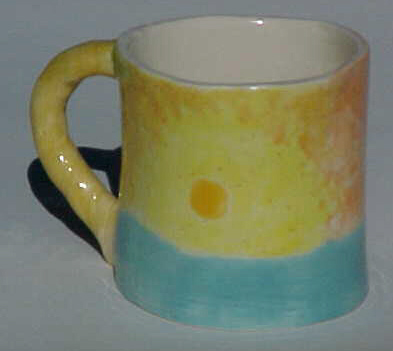
- Cup or mug - be sure to use a glaze that is approved for food.
- Beads
- Spoon
Some of my ceramics experiments are shown here.
Techniques
- Joining two pieces of clay - This is sometimes referred to as slip and score. You want a good, strong joint to hold pieces together. Put some slip (a clay and water solution) on both sides. Score (mark or scratch) one piece of clay in one direction and the other piece in the opposite direction. Push the edges together and smooth out the joint.
- Pinch pot - First, roll a ball of clay between the palms of your hands. Hold your hands so your fingertips overlap about an inch. Hold the ball resting in the fingertips of the top hand. Using your thumbs push into the middle of the ball of clay. Rotate the ball slightly in your fingertips and push your thumbs in again. Use your fingers to help support and shape the outside of the bowl. Repeat until finished. Strive to make the walls and bottom thinner and uniform in thickness and the opening rounder with each motion. Do not make the walls too thin or the pot will not be able to support its own weight and will collapse. If cracks develop on the pot, immediately use a little water and smooth them out.
- Coil - Start with a ball of clay and form it into a long cylinder in your hands. Place the cylinder on the table. Using both hands spread your fingers slightly. Using only your fingertips, apply light pressure; roll the cylinder in one direction, spreading your fingers apart as you do so. Move the cylinder back to the starting point and repeat until cylinder is the correct diameter. If the coil becomes too flat in one direction, flatten it out so that it will be more square-ish and roll applying light pressure until it is round. If you are going to make sharp bends in the cylinder (like in making a small coil pot), coating the outside of the coil with water before bending will help prevent cracking.
- Coil pot - Take a ball of clay and flatten it to make a base for the pot. Then make a coil of clay. Flatten one end of the coil into a ramp. Remember that you are joining two pieces of clay so follow the instructions above. Add some slip and score the bottom of the coil and the top of the base where the coil will be placed, then start wrapping the coil around. After you have used up that coil, go back and smooth the joints together. Then add another coil in the same manner until the pot is the size you want. It is easy to make the pot become larger by laying the coil on the outside edge of the prior coil. To make the pot narrow lay the coil on the inside edge of the prior coil. If you want a smooth surface on the pot, add more clay (with slip) to fill in the joints between the coils. Support the pot from the inside when you are working on the walls. Always work the coils down toward the base as this compresses the coils and joins them more securely. Remove excess water from the inside of the pot with a sponge.
- Slab - Many items can be used for rolling clay flat (see cross and box above). Stiff cardboard tubes and dowel rod larger than 1" in diameter work well. Don't use your wife's or mother's rolling pin - you'll get in trouble! You also need two pieces of wood (dowel rod works well) that are the thickness that you want the clay (no thinner than 1/4"). See drawing below. Roll twice in one direction, then turn the clay over and rotate it 90 degrees (1/4 turn). This keeps the clay from sticking too much to your working surface and allows you to control the shape of the slab. When drying, slabs tend to curl upwards at the corners (see the box above), to minimize this, flip the slab over ever few hours.
- Tube - Find a tube made from cardboard (like paper towels come on), plastic, wood, or glass of the size you want to use as a template. Wrap newspaper a couple layers thick around the template (not too tightly or it will be hard to slide the newspaper off the template later). The newspaper needs to be several inches taller than the tube you are going to make and straight or flush with the bottom of the template. Tape the newspaper to itself, NOT to the template. Make a slab of clay. Cut the clay to the desired height and cut one end square. Wrap the clay around the newspaper. Where the clay overlaps, cut through both layers at a 45 degree angle undercutting the inside layer (see illustration below). This method will leave the clay tube slightly larger than the template. Join the ends using slip and score. Set aside and let it dry some. Decorate as desired, and then slide newspaper and clay off the template. Remove the newspaper when the clay has dried more. See tube and coffee mug above.
- After the clay has dried to leather hard, you can handle it more easily (still be gentle as it will be delicate). Smooth out any imperfections. You can use a knife, round dowel rod, or a really neat clean-up tool that has a flat blade on one end and a slightly curved quarter moon shape on the other. A little water will also smooth over a rough or textured surface. Allow to dry for a week or more until it is completely dry. This is called bone dry. Items that are bone dry are called greenware. Items MUST be bone dry before putting into a kiln or the water in them will expand and explode, destroying your piece and maybe damaging others.
- After items are fired once, they are called bisque. Bisque is much stronger than greenware.
- Glazing - This confused me at first because the term glaze is used to describe the clear shiny finish of ceramics and also the coloring used to "paint" the object. We'll talk about the colored glaze first. There are two types of colors - underglaze and glaze. Apply these thickly and make sure you get an even cover. If you don't your object will come out looking splotchy. Do not put glazes on top of each other. As they are fired, the glazes will mix and probably not give you the effect you wanted. Instead, paint with one color, fire, add the next color and fire again.
- Underglaze is used on greenware before the object is fired. You apply underglaze to the greenware then fire the object. You can correct problems by adding more glaze colors (not underglaze since it is now bisque) then re-fire.
- Glaze is used on bisque after the first firing. Once the glaze is applied, the object is fired. You can correct or add more glazes then re-fire.
- When you are satisfied with the color, then apply the clear glaze and fire the object one last time. You have to be careful with clear glaze as it melts and runs during the firing. If you get some on the bottom of your object, the glaze will cement the object to the kiln. This will damage the kiln and your piece of artwork will probably be destroyed. Keep the glaze more than an 1/8" from the bottom of your object. You can apply clear finishing glaze either by painting it on with a brush or dipping the object into the glaze. Clean any glaze off the bottom with a clean damp sponge.
- If you use glaze on bisque, you can also put on the finishing clear glaze and then fire. This eliminates one firing, but you lose the ability to correct problems with the painting glaze.
Hints
- Clay that is very wet will be slick and will bend easier without cracking, but will not be as strong or hold its shape as well. When the clay gets a bit dryer, it becomes very sticky and is hard to work with. Dry clay will be hard or stiff, will hold its shape better, but will crack if you try to bend it too much. As you work clay in your hands, it will naturally dry from your body heat. To suit your needs, add a little more water or allow a piece to dry a little. For example, when making a coil pot, the clay needs to be wet to curve into the shape and for slip and scoring. However, after a few coils have been made, it may be necessary to let the clay rest and harden a bit to make it stronger so that it can support the weight of extra coils.
- It is always best to have a drawing or template of the object you are trying to make before you start working with the clay. Full-size or full-scale templates are ideal. It makes it so much easier when you can refer back to the drawing or template as you make the object.
- Clay shrinks as it dries so the finished size may be 10-25% smaller than it started.
- Keep a small bowl of water close by for wetting clay. Use a bucket of water for cleaning up hands and tools. Have some old rags handy for drying up. Sponges are handy for cleaning up any remaining mess.
- Do not wash your hands in a sink or pour clay or slip down a drain, dump it in the yard. The clay will clog your drain.
- If a dry piece breaks, you can usually repair it by getting the surface moist, adding a little wet clay, and smoothing it out. Let it dry thoroughly again.
- If cracks develop, widen them with a pointed tool, wet them, and push more clay into the crack. Smooth it out with a wet finger. After the clay has dried, clean up any rough edges.
- If you are trying to make a complex object, it might be easier to start with a hunk of clay the right size and shape, let it dry overnight, and then shape using tools to carve or sculpt the object (ceramic clean-up tools are great for this). Be careful not to carve the clay too thin, as it will break easily. Also, if you are hollowing out the inside, don't thin the sides too much or put too much pressure on them or you will have an extra hole in your project.
- To make a shape with flat sides, drop the clay onto a flat surface or use a flat board to shape the clay - it's a lot easier than trying to use your fingers and hands!
- Most glazes (especially red) contain lead or other poisonous chemicals and thus should NOT be used for projects that will hold any type of food or beverage. Use only glazes that are specifically marked as non-toxic or for use with food.
- For making neckerchief slides, you can either make the ring for the neckerchief out of clay as part of the object or glue (use E-6000™) a PVC ring on after the piece is complete. If you use PVC, use a smaller diameter ring than you normally would use as the pieces will be heavier and are more likely to fall off with disastrous results. Don't glaze the back of the piece where the PVC ring will be attached.
- If you make the neckerchief slide ring out of clay, you must remember that clay will shrink as it dries and during the first firing. Make the ring about 1/2" in diameter - a dowel rod is handy for this. Follow the instructions above to make a tube or make it from a coil. Don't paint (glaze) the inside of the ring as that would make it slicker and you want a rough surface to hold onto the neckerchief material.
- In both cases, you might want to wrap a strand of leather lacing through the ring two or more times (then tie it in the back or just glue it in place) to make the opening smaller and give it more grip. See Keeping Slides On for more ideas.
- Scratch your initials and the date on the back or bottom of the piece.
- If you have to leave a project for a period of time, place it in a plastic bag and seal it tightly. If it is a little too dry, add a damp paper towel to the bag or over the project. You may have to add a little water when you start to work again.
- A spray bottle is handy for applying a little water evenly to a whole project.
- Sometimes it is easier to work with pieces - to attach them together, shape, ... after they have had some time to harden (a few minutes to maybe a day depending on conditions).
- Try not to get water on your work surface (table top or plastic covering) as this will make the clay stick and it will be difficult to remove pieces without destroying them. Wet clay will bend easier without cracking, but is stickier.
- While the clay is moist, projects can be decorated with leather tooling stamps, carved with tools, impressed with rope or other textured surface, or add small coils or shapes of clay.
- There are many items available around the house that can be used to add a texture to clay. Some of these include: comb, brush, pinecone, seashell, screw, rope, fork, wheels, and cloth.
- Tools for working with clay (like knives, picks, sponges, shaping tools, cleanup tools, etc.) can be readily purchased from ceramics stores (check the Yellow Pages under Ceramics) for $2 to $3 each or $6 and up for kits. However, the novice can make do with easily obtained or constructed tools. Plastic knives are good for cutting thin wet clay. If you wet the knife a little, it will slice through the clay better. Manicure sets, pencils, bamboo skewers or toothpicks are handy for drawing in wet or slightly dry clay. Drag them on the surface to make shallow marks or use a series of poked holes to make deep marks. Pieces of plastic bottles also make good shaping tools. An old style computer chip with leads, when glued to a short dowel rod (use E-6000™) makes a great scoring tool. A small carving or whittling knife is good for sculpting leather hard clay. Sandpaper can be used to smooth whole surfaces, or use with a block of wood to get a flat surface. A rounded rock can be used to smooth surfaces.
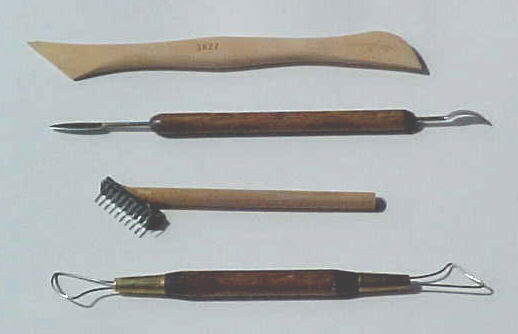
Top to bottom: wooden shaping tool, clean-up tool, scoring tool made from a computer chip, wire shaping tool

Sandpaper, bowl, bamboo skewer, plastic knife
- After the clay has hardened, but before it has been fired is the best time to clean up your project. Go over the whole object removing any rough edges, removing any unwanted texture, getting rid of any blemishes, rounding edges, ... Some useful tools for doing this include: sandpaper, the side of a dowel rod, clean-up tool, and knife.
- If you want to carve a picture or saying in an object, wait until the clay has dried. Then use a sharp or rounded stylus to make the lines. To remove the clay dust from your project blow it away (no spitting please) or use a small soft brush. If you try to wipe it away with your fingers, it will lodge back in the lines you carved.
- Small bowls or blocks of wood can be used as forms for turning clay slabs into bowls. Make a slab of clay large enough to cover the whole form. Turn the form upside down and lay the slab over it. Gently shape the clay to the contour of the form. Cut off any excess clay. When the clay has dried enough to hold its shape, remove it from the form and clean up the edges. Plain bowls (without ridges and lettering) work best.
- Make feet for bowls from balls of clay or small coils. Space the feet toward the outside of the bowl to make it more stable. If you use three feet, your bowl will not wobble. If you use four feet, it probably will rock a little.
- Figures of animals and people or faces are difficult to make because the human eye is very critical of size, shape, and symmetry. If one leg is slightly larger or longer, or the knee is in a slightly different position, the eye picks up those differences very fast. Leave figures until you have some experience and then start out simple and easy (maybe only a face first). While you are making them, don't get so focused in your work that you don't look frequently at the whole object to make sure all the parts look right together. For example, don't focus so hard on making one ear look right without checking to make sure that the ears are the same size and located on opposite sides of the head.
- Take your time, don't be in a hurry to finish, be patient and careful.
References:
- "Boy Scouts of America Pottery Merit Badge Book"
- Simple Pottery by Sara Pearch with text by Geraldine Christy
- Clay by Jeannie Hull
Thanks to Robbie Gavos for all her time, patience, and insightful instructions!
Copyright © 2003 Vincent Hale