
[Title] [text TOC] [image TOC] [Site Search]
 [Donation]
[Donation]
[Donation]
| LED Flashlight |
|---|
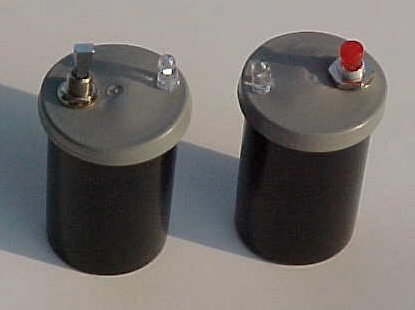
See the NEW and IMPROVED LED flashlight Junior!
This light makes a great light for camping. It can be used for tending to chores at night in the tent, reading, and even as an extra emergency light.
These are great for second year Webelos (10 year olds) to make. They could be used for Craftsman or Scientist, or Readyman. They also make a great present maybe for guest speakers. Of course, Boy Scouts
LEDs are more reliable, durable, and last longer than regular flashlight bulbs. They have a lifetime of 100,000 hours where a light bulb is much less than 100 hours. LEDs do not have a delicate filament to break like a light bulb. They draw less power so batteries can last 10 to 100 times longer.
When I went to Philmont for ten days of backpacking, this is the only light I took. I was confident that it would not break and I didn't have to take extra batteries. It weighs only 2.2 ounces.
In one test with this setup, the LED was on continuously and pretty bright for about 100 hours (about four days). After that the light steadily diminished, but stayed on for another 100 hours or four days. Your mileage may vary.
One indication that the battery needs to be replaced is that you can look directly into the LEDs and see the two very fine wires inside.
All the parts can be purchased for about $3 to $4 USD. Assembly time is less than half an hour with enough soldering irons and wire strippers. Youth as young as 10 years of age can make this with adult supervision.
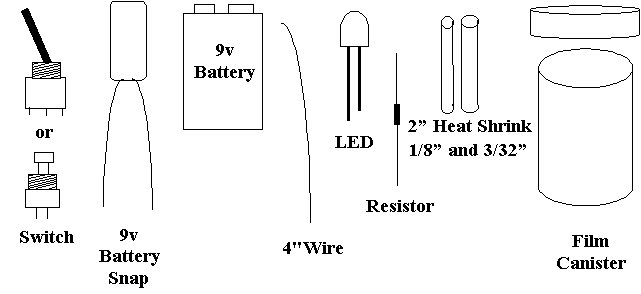
| Materials | Tools |
|---|---|
|
1/4" Switch 9 volt Battery snap 9 volt Battery 4" wire LED Resistor 2 1"x1/8" diameter heat shrink 2 1"x3/32" diameter heat shrink Film canister |
Soldering iron Solder 1/4" hole punch Wire cutter Wire stripper Hair dryer Nail Electrical tape Paper clip Knife or scissors |
Caution: LEDs are sensitive to (that is they are damaged by) heat and static electricity. I haven't had a problem with either of these, yet. However, use some precautions by touching something metal that's grounded (like an appliance) before touching an LED. When soldering, don't leave the soldering iron on the LED leads for very long. If you don't get it soldered right away, back off, let the LED cool, then try again.
Soldering
Do not "fling" solder off a soldering iron - it will burn whatever it lands on. Use a moist sponge or cloth to clean off solder. Do not use old solder that has been left on the soldering iron.
Move heat shrink as far from the soldering iron as possible.
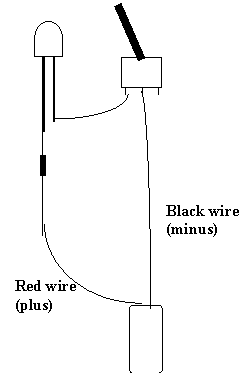
Attach the two items to be soldered so there is good physical contact between them. Twist wires together or around the part leads.
Some electronic components are heat sensitive - switch bodies will melt, electronics (like LEDs) can be fried. You can prevent this damage by minimizing the amount of time heat is applied and by using a heat shrink to block some of the heat. A wooden clothespin makes a good heat sink. Simply place the clothespin between the part you want to protect and where you are going to solder.
The soldering iron should be hot. Touch it to the top of where you are going to solder. Hold the iron there for a few seconds to get the area hot. Then touch the solder to the junction of the two items. The solder should melt and flow between the two.
Slide the heat shrink in place to cover all exposed wires.
It helps to have several hands to hold the items, solder, and iron. When working with youth it is imperative to have an adult and youth working together. Let them solder if they seem to be careful, otherwise just let them hold the project steady for the adult.
Notes on Parts
Switch - The switches that seem to be widely available and work well are single-pole, single-throw sub-mini momentary pushbutton and single-pole, double-throw sub-mini toggle. Both are about the same size. The toggle switch works like a house light switch. The momentary switch needs to be pushed continuously to keep it on. I have used a large thick rubber band to hold the momentary switch on for extended periods. Both switches can be found with 1/4" threaded necks. A small nut holds the switch firmly in place.
Personally, I like to use the momentary switches. If they accidentally get pushed on in your pack they could shift and turn off. A regular switch is more likely to stay on until you discover it and turn it off. I wrap a large rubber band twice around the film canister. When I want the LED to stay on, I simply place the rubber band on top of the switch. The rubber band has enough pressure to keep the switch depressed.
LED - I like the bright white LEDs, but they are the most expensive. Red is better for not effecting your night vision. Yellow, orange, blue, green, and many other colors are also widely available.
Battery - I choose to use 9-volt batteries because the battery snap is smaller and cheaper than the battery holder for 1.5-volt batteries. You don't need an expensive brand, "Heavy Duty" will work well. They are available for 2 for $1 USD at discount or dollar stores.
Heat Shrink - This covers up all exposed wires so they don't short together. This is important since things are pretty tight inside the film canister. I used both 1/8" and 3/32" on this project. The 1/8" will slide over the resistor. The 3/32" will slide inside the 1/8" on the short wire making it easier to work with. The 3/32" was occasionally a little small, the boys had trouble getting it over some of the solder joints. You need 2 pieces of 1/8" about 1" to 1 1/2" long and 2 pieces of 3/32" about the same length. Cut one of the 3/32" pieces in half to make the short pieces that go on the switch terminals. If you have any bare wire showing after the heat shrink is in place, cover it with a small piece of electrical tape.
Resistor - The value of the resistor needs to be calculated for each different LED. The equation is:
Where R is the resistance of the resistor in ohms, B is the voltage of the battery in volts (in this case 9 volts), V is either the typical or maximum forward voltage of the LED (3.6v), and I is the current rating of the LED in amps (20mA or .02A). The resistors used on this project were rated at 1/2 amp.
One source for switches, battery snaps, heat shrink, and LEDs is BG Micro. They sell a 5mm white LED that puts out 6400 millicandelas or mcd (a measure of brightness) for about $2. I am in no way associated with BG Micro, just pleased with their service.
Contact me for information on kits.
Film canisters can usually be obtained from any film-processing store for free.
Radio Shack is a good source for the other supplies.
Making the flashlight can be broken into 4 steps or stations.
1. Gather all the materials - switch, battery snap, wire, LED, resistor, heat shrink, film canister.
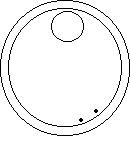
2. Prep Work - Put holes in lid and install LED and switch, strip insulation from ends of wires, prepare ends of resistor and short wire.
3. Assembly - Put heat shrink in place and solder.
4. Inspection, heat shrink, battery, and test.
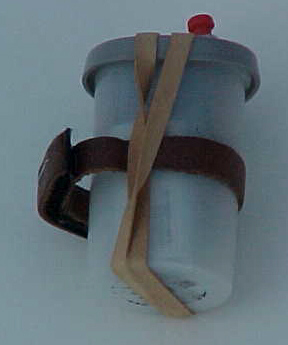
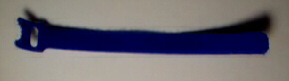
I put a small loop of leather loosely around the film canister. The ends of leather are attached with Velcro that is sewn on. Most tents have a small loop of fabric in the top of the ceiling. Hang the LED from the loop and adjust it so the light shines down on the tent floor or reflects off the ceiling. Velcro tie wraps (available through BG Micro) also work well.
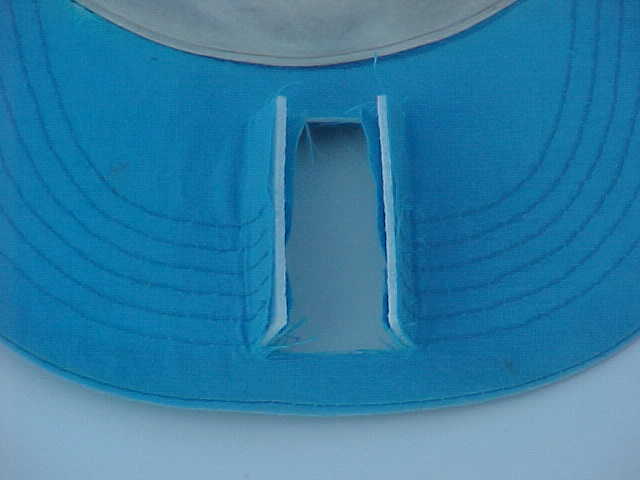
Another experiment I tried was to make a headlamp by cutting a rectangular hole for the film canister in the bill of a baseball hat. Headlamps are great because they always shine the brightest light in the direction you are looking. Just be sure not to shine it in anyone’s eyes.

Ready for more fun with LEDs? Try these out: