
[Title] [text TOC] [image TOC] [Site Search]
 [Donation]
[Donation]
[Donation]
| Lacing Techniques |
|---|
See the Leather Chapter for more instructions, hints, tips, and ideas.
The instructions here are for a couple of very simple methods of lacing. For more decorative techniques see the references at the bottom of the page.
HolesFirst of all you need holes in the leather. The holes should be close to the edge (1/16" to 1/8") and evenly spaced.
Holes can be made with a hole punch if your lacing is very thick, but the best tool to use is called a thonging chisel (it looks like a fork).
To use the thonging chisel, you need a block of hardwood and a mallet. Lay the item face up on the wood. Start at the corner and drive the chisel through the item with the mallet. Remove the chisel and place the first prong into the last hole (this will keep the holes evenly spaced). Continue in this manner until all holes are punched.
Lacing MaterialsThe material I use the most is waxed thread with a large eyed needle. You can also use leather lacing (about 1/8" wide) or craft strips (widely used in braiding). These are all readily available from leather or general craft stores and come in a variety of colors.
HintYou can make the stitches invisible by lacing the project inside out.
Running StitchYou will need a piece of lacing about 1.5 times the length to be laced for this stitch.
The lacing simply goes in and out from one side to the other. Tighten the stitches as you go.
When you start this stitch, leave some extra lacing at the end. After you have made a couple of stitches, go back and tie the end to the first stitch. You can add a drop of glue to lock the knot tight.
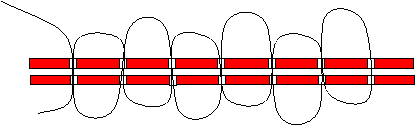
To make this look a little fancier, if the holes are large enough, you can go back through the holes in reverse order filling in the gaps between the first stitches. Then you can tie the ends together and add a drop of glue to lock the knot tight. This method requires lacing about 3 times the length to be laced.
You can make this more attractive by using a different color for the second set of stitches.
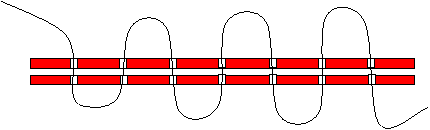
Loop StitchYou will need a piece of lacing about 3.5 times the length to be laced for this stitch.

This is another simple stitch. It is made by lacing around the edge and through the hole. You only go through the holes from ONE side.
To start, take about 1/2" to 1" of lacing and run it between the two sides between the holes and the edge of the leather. The loops will lock the lacing in place so it doesn't come loose.
The first stitch goes through the first hole from the inside (between the two sides) to the outside. Loop over the edge and go through the first hole on the opposite side and again through the first hole. You have just made a loop through the first hole. The end of the lacing should be inside the loop. Pull the lacing tight after every stitch. Now move to the next hole and go through both sides of leather. Make sure the end is inside the loop. By looping the lacing around the end, you will lock it in place.
Continue looping and pulling tight until you are finished. Remember that the lacing always goes through the holes from the same side.
When finished, run the needle between the two sides and through the loops for 1/2" to 1" then pull it out. Pull the lacing tight and cut off any excess. This locks the end of the lacing in the same manner as the other end was locked.
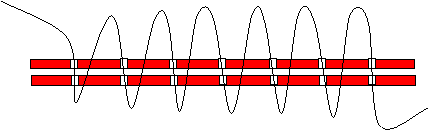
Cross Whip StitchThis stitch takes lacing about 6 times as long as the length to be laced.

This stitch is almost the same as the loop stitch described above. The difference is that you only use every other hole the first time through. When you get to the end come back in the opposite direction using the holes you skipped the first time. This will create an "X" pattern.
How to Lace by Midas Leather Tool Co., Ft. Worth, TX