

[Title]
[text TOC]
[image TOC]
[Site Search]
 [Donation]
 |
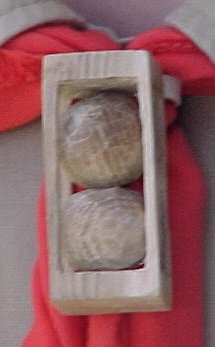
Ball in a Box |
 |
| Materials |
Tools |
1" x 1" x 1" wood
PVC ring |
Pencil
Knife
Sandpaper
E-6000™ |
See the Wood Carving section for more instructions, hints, and tips.
There are several things to consider before you start:
- The end grain is harder to remove. Make the top and bottom solid and only carve out the four sides.
- If you are going to carve all six sides, start with the end grain ones first. You'll be less apt to break it.
- Square bars are nice, but make the ball smaller. If you make the bars triangular the ball will be bigger, more impressive, and won't fall out as easily.
- You don't want to apply a finish because that would probably glue the ball to the box. So chose a wood with a pretty grain like butternut, catalpa, or mahogany.
- Get a square piece of wood of whatever size you desire. You may want to make it a little longer in the "with the grain" dimension especially if you are going to leave the end grain sides solid.
- Draw the bars on all sides.
- Make cuts on all the lines. Angle them in at a 45 degree angle to make the bars triangular.
- Start removing wood from the corners. I like to move around and do a little work on each corner. Remove as little wood as possible near the middle of each bar.
- Always keep in mind the shape of the ball that you are trying to find inside.
- Keep removing wood until the ball is free. Be very careful not to break the bars.
- Clean up the bars as necessary.
- Round up the ball by moving it around and removing any high spots. A pair of calipers can be helpful.
- Sand the bars and ball if desired.
To make a neckerchief slide, glue a ring to one of the bars using E-6000™ glue.
If you are looking for more of a challenge carve two or more balls in a box. Just make the box two or three or more times longer than it is square. Be sure to give yourself a little extra room for the wood that you remove between the balls.
You might also be interested in making captive rings and lollipop in a box.
Copyright © 2006 Vincent Hale