

[Title]
[text TOC]
[image TOC]
[Site Search]
 [Donation]
 |
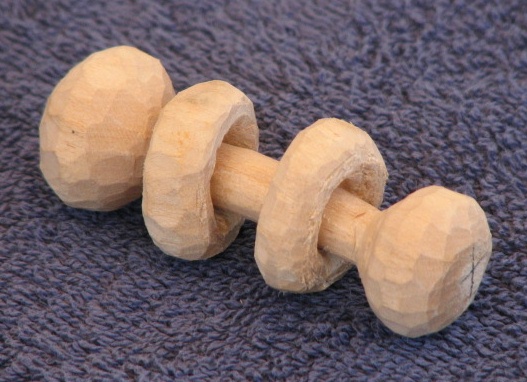
Captive Rings |
 |
| Materials |
Tools |
1"x1"x3" basswood
|
Pointed Knife
Sandpaper
Pencil
Ruler |
See the Wood Carving section for more instructions, hints and tips.
This is not a very difficult project as long as you have a sharp, thin, pointed knife. It will take two to three hours to make the first one, but you should get faster after that. There is something very satisfying when you free the ring from the shaft.
Everyone will be inspecting it closely to see how you got the rings onto the shaft.
First a couple of words about rounding. At several points in making the captive rings, you will have to round a corner. Understand that to make a circle you are only approximating the circle with a bunch of straight lines or cuts. The more lines or cuts you have the closer to a circle you will get.
The easiest way to do this is to first make a cut at a 45 degree angle to the corner. This will clip the point off the corner and give you two points where you had only one before. Next, take off the two points that you just made in the same way. Now you have four points. Keep doing this until you have a close approximation of a quarter of a circle. The smaller the corner, the fewer cuts will be required.
While carving this project, look at your progress from the end so you can see a cross-section. If it appears a little too square, then take some off the middle (where the original corner was) and then smooth it in. Remove the highest bumps and make it as smooth as possible.
You need a thin, pointed knife blade to get into the tight places of this carving; a blade with a slight hook works even better. A blade with a rounded point won't work.
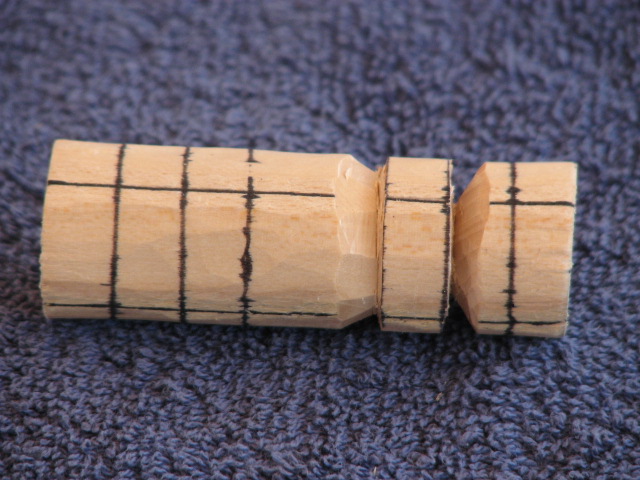
- Mark the diagonals on both ends.
- Mark the middle of each of the four faces.
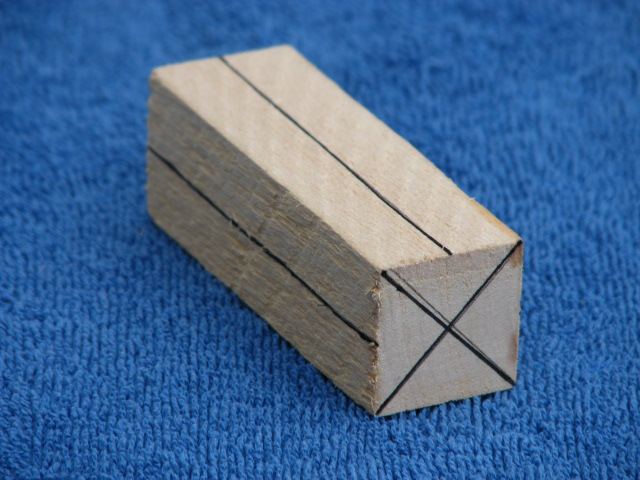
- Round the block into a cylinder. You will be carving from centerline to centerline on the four faces. Use the diagonals to help you get the cylinder centered. Look at the block from both ends to make sure it is round.
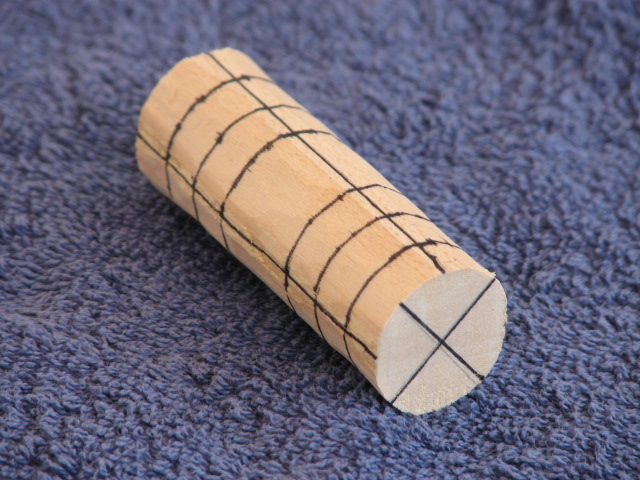
- Mark lines at 3/8", 3/4", and 1 1/8" from each end. Make these lines all the way around the cylinder either using your fingers as a guide or a piece of stiff paper or plastic. The first line marks the middle of the ball on the end of the shaft. The second line marks the outside edge of the ring and the third marks the inside edge of the ring.
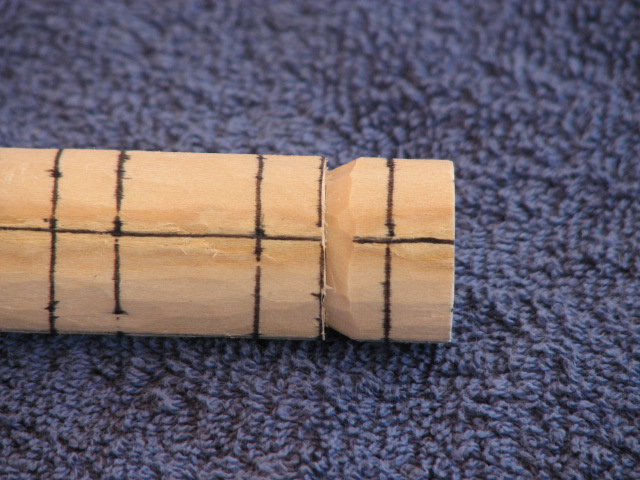
- Make a stop cut along the second line from one end (the outside edge of the ring) all the way around the cylinder. Make an angled cut into this as shown in the photo below. Don't go too deep with the angled cut as this cuts into the flat side of the ring.
- Continue making stop cuts on the line and angled cuts into the line. You want to reduce the diameter to about 3/8" (this will be reduced smaller when we free the ring from the shaft). Keep the depth even and centered. The side of what will be the ring should be flat.
- Next make a stop cut along the third line from the end (the inside edge of the ring) all the way around the cylinder. Make an angled cut into this as shown in the photo below.
- Continue making stop cuts on the line and angled cuts into the line. You want to reduce the diameter to about 3/8". Keep the inside edge of the ring as flat as possible.
- Repeat steps 5 through 8 for the other end of the cylinder.
- Round each end into a ball. You can make them a little smaller in diameter.
- Now reduce the center portion of the round shaft to about 3/8" in diameter. Try to make it centered and as uniform as possible. You will be making the shaft smaller in diameter after the rings are free, but it helps to have it round to start with.
- Now we are ready to free a ring. Start by making stop cuts from the middle of the shaft as straight in as possible all the way around the shaft into the inside of the ring. The knife blade is laid flat against the central shaft. Keeping the blade flat against the shaft will make the hole in the ring smaller and will look better. Circle the shaft at least a couple of times making these stop cuts. Then you should be able to run your knife blade completely around the shaft without removing it from the wood.
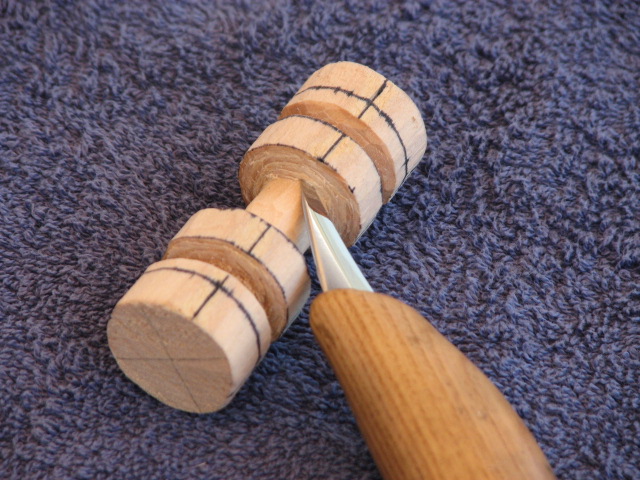
- Now repeat the stop cuts in the opposite direction as the cuts you just made. Do this all the way around the shaft. Remove the slivers of wood as best you can. Do this by making cuts on opposite sides of the shaft.
- Repeat the prior two steps. You want to cut through the ring about 90% of the way from the middle side and 10% from the side near the end ball. If you have trouble or want to make this easier, you can remove some wood from the outer side of the ring (closest to the end ball). The thinner the ring, the easier it will be to free.
- When you are almost through, make the straight in stop cuts as best you can from the outside of the ring (nearest the ball). Since there isn't a shaft there your "straight" in stop cuts will be at an angle. Continue working both sides of the ring, doing most of your work from the middle of the shaft working on the inside of the ring.
- When you feel the ring start to wobble or move stop working on it and do the ring on the other end. If you free this ring now it will be loose and is a pain to keep out of the way as you work on the other end.
- Once you have both rings almost loose a gentle little twist should break them free. If not, go back and make some more stop cuts in both directions around the shaft.
- Now all that remains is to clean up the shaft reducing it to a uniform diameter of about 1/4". Where the shaft transitions to the ball on the ends is the hardest part to get smooth. Make sure your knife is very sharp. Try cutting from both sides. You might have to take some sandpaper to this area.
- Round the rings on both the inside and outside.
You can leave the captured rings rough with your cut marks showing so that everyone will know it is carved, or you can use sandpaper or riffler files to make it all pretty and smooth.
It's hard to apply a finish to this because the rings tend to get stuck to the ends or the shaft, so just be content with no finish. It will get a bit dirty with time and handling.
To make a neckerchief slide, glue a PVC ring to one end with E-6000™ glue.
You can make a longer version with more rings if you want. You need 3/4" between rings and the rings are 3/8" thick for a total of 1 1/8" for each additional ring.
You can combine this with other elements like a ball in box, lollipop, chain, or a slider. See what interesting creations you can come up with.
Copyright © 2011 Vincent Hale