

[Title]
[text TOC]
[image TOC]
[Site Search]
 [Donation]
 |
Hand Holding Cross |
 |

| Materials |
Tools |
2" x3 1/2" x 1/2" basswood
PVC ring |
Carving knife
Sandpaper
Finish
E-6000 Glue |
See the Wood Carving section for more instructions, hints and tips.
- Layout the perimeter or glue a template on a piece of basswood. The grain should run in the long dimension of the cross.
- Cut it out using a coping or scroll saw.
- Layout the interior. Make a line around the perimeter half the thickness of the wood.
- Make stop cuts on the top of the thumb and around the bottom of the palm and fingers.
- Remove the wood of the cross down about half the thickness. Try to keep it flat and smooth. The hardest part is the area between the palm of the hand and the tips of the fingers. A small skew chisel works best here.
- Make a stop cut along the bottom of the thumb to separate the thumb from the fingers.
- Round the palm and thumb. Be sure to round them as they disappear behind the carving.
- Form the tip of the thumb. That is, if the thumb is not resting on the arm of the cross, but is slightly below it, then remove the wood behind the tip of the thumb.
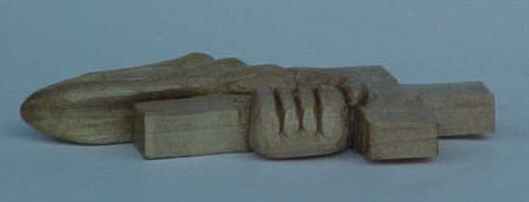
- Now form the slope of the fingers. The fingers are made up of three segments. The tip and middle segments are angled like the roof of a house. The third segment that connects to the hand is vertical. The tip section is the shortest; the section that connects to the hand is the longest. At this point, the fingers should look like a mitten.
- Now separate the fingers. Make a V cut down the middle of the mitten. Then another V cut on each side of that cut to make four fairly equal fingers. The tip segment of the fingers should be slanted slightly upwards. The V cuts (that is the fingers) should stop about one third of the way from the back of the carving to leave room for the knuckles. Remove a small triangle of wood at the base of each of these three cuts where the fingers join the hand. Round the knuckles as they go behind the carving.
- Now adjust the length of the fingers. The pinky should be the shortest. Round the fingertips.
- Round the top and bottom of the sleeve.
- Gouge out the sleeve by the base of the cross. You are trying to make the sleeve look open with just the wrist extending from it. You can either use a small gouge or a knife.
- Gouge out the folds on the sleeve. Start on the front and then continue them around on the top of the sleeve.
- Add a crease where the thumb meets the palm and below the joint in the thumb.
- Undercut all around the hand edge where it meets the cross. This will give the impression that the hand is separate from the cross.
- Sand the cross and hand to remove any rough spots.
- Glue a PVC ring to the back. Use a pin or clasp to make a SWAPS or bolo.
- Finish with sealer or stain and seal.
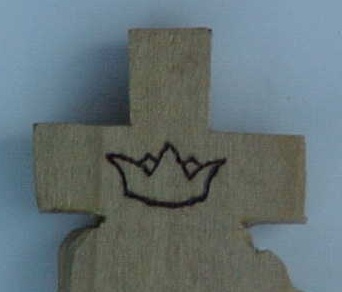
Consider putting a crown on the back of the carving. You could make the crown by carving, wood burning, or just using a permanent marker. The cross represents the hardships or crosses that we carry in life and the crown represents the rewards we will receive in Heaven. Just like the song "The Old Rugged Cross" says "I'll cling to the old rugged cross and exchange it someday for a crown."
Thanks to Bob Case for teaching me this project.
Copyright © 2007 Vincent Hale