
[Title] [text TOC] [image TOC] [Site Search]
 [Donation]
[Donation]
[Donation]
| Pliers |
|---|
| Materials | Tools |
|---|---|
|
3/8" x 3/8" x 3" basswood PVC ring |
Thin bladed carving knife Pencil E-6000™ glue |
See the Wood Carving section for more instructions, hints and tips.
The first time I heard you could carve pliers from a block of wood, I didn't believe it. Then someone showed me a working pair of pliers. I still doubted that it could be done. Then they showed me how to make them and now I'm a believer. This is a novel project that is sure to generate some conversation and questions.
This is probably too difficult for children under the age of 12. However, this would make an impressive award for Webelos who earn the Craftsman pin or an adult or youth who showed their expertise with tools or construction.
Ernest "Mooney" Warther made carved pliers famous. He made 750,000 of them in his lifetime. He has a museum that shows some of his incredible carved trains. Check out the Pliers Tree that's made of 511 working pliers carved out of one piece of wood!
Thanks to Jean Caster for introducing me to Mr. Warther and this novelty.
To get started on your first pair of pliers, you will need a piece of basswood 3/8" square and 3" long. Make sure the grain is straight and runs the length of the block. Craft stores sometimes carry 3/8" square stock. You'll also need a thin blade knife. Exacto™ will work, but better is a scalpel. A thick bladed knife will split the wood in the wrong places.
Don't get discouraged if your first one or two or three breaks. Be persistent and learn from each of your failures. See which cuts you need to make deeper. It may take several until you get one to open, but then you will have mastered the technique and be able to turn them out more consistently.
First layout all the cuts.
 |
Layout a centerline on two opposite sides. This line will be where the handles and jaw are split. |
 |
Draw two diagonal lines on one side as shown in the drawing. The first should be about 1/2" from the nose or front and the second should be about 1" from the nose. |
 |
Extend the diagonal line around on the top. |
 |
Extend the other diagonal line around on the bottom. |
 |
Now draw in the two diagonal lines on the opposite side. You want the two sides to match up and be symmetric. |
 |
Draw two lines on the top. They should divide the width into thirds and extend the full length of where the diagonal lines are located. |
 |
Finally, turn the block over and draw the same lines on the bottom. |
It only takes ten cuts to make the pliers, but every cut is critical to the success of the project.
Each of the following is called a "cut". With a lot of practice, you may be able to make these in one cut each. However, when you are just starting out take as many passes as you need to make the cut. Some of the cuts that go all the way through will take a bit of pressure. Rocking the blade or block back and forth helps. It helps to have a very sharp blade.
 |
Carve the front to a point. |
  |
Cuts 1 and 2 These cuts go all the way through the block. It is very important that they be straight up and down. If you want, you can cut from both sides. The risk is that your cuts won't match up exactly. The cuts need to extend past the ends of the diagonals as shown in the second drawing. Rocking the blade or block back and forth will help make the cut easier. |
 |
Cuts 3 and 4 Next make the diagonal cuts on one side. These cuts go one third through the block at about a 45-degree angle. You may feel or hear when they cut all the way through to Cut 1 or 2. |
 |
Cuts 5 and 6 Make the diagonal cuts on the opposite side. |
 |
Cut 7 This is a very tiny, but very critical cut and the most difficult because it is cross-grain and you can't see what you are doing. It is shown in green in the diagram. It goes in at about a 45-degree angle toward the front of the pliers. Because it is at an angle you have to make it a lot longer (deeper) than you would think. Make sure you cut all the wood in the middle third of the block. Run the top of your knife blade down Cut 1 and work it across. Then flip your knife over and run the top down Cut 2 and work it across in the opposite direction. Rock the blade back and forth to help make this cut. |
  |
Cut 8 This cut is very similar to the prior one only it is on the opposite side and angled toward the back handle of the pliers. The second drawing shows how these cuts are angled. The green lines are Cuts 7 and 8. Note that they are hidden inside the block. |
 |
Cut 9 and 10 Be careful as you split the wood in half. Make a cut straight in the middle of the end of the block. Then in the center of the side slice through the block following the cut you made in the end. Cut all the way through the block. Be sure the cut extends all the way back to the diagonal cut. Cut 10 is longer so making it straight is more critical. |
Now you are ready to try to open the pliers. Be very careful and gentle. Don't force it or it will break. If it doesn't want to open, try extending cuts 7 and 8 a little further into the wood. Check all your other cuts as well and make them a little deeper. Now try it again.
If it still doesn't want to open, repeat the above steps until it finally opens up. Then clean up any loose shavings.
If you want, you can clean up the carving, rounding and shaping it, or you can leave it rough. As you get more skilled at making pliers, your cuts will be cleaner. You can also make Cuts 1 and 2 so they don't extend beyond the diagonal lines on the top and bottom of the block. The ideal shape of Cuts 1 and 2 is a hexagon. The instructions tell you to make them rectangle just because it's easier to do that way for the beginner.
Once you have made a few you can probably complete them in 10 to 15 minutes.
Why not try to make a pair of scissors where the pivot point leaves short handles and long blades?
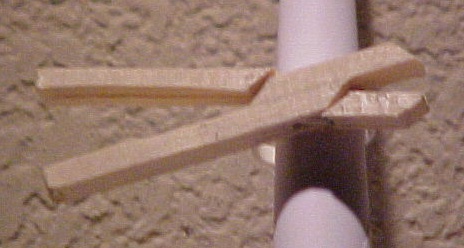
To make a neckerchief slide, glue a PVC ring to the back of the pliers using E-6000™. Be careful not to glue the pliers together.