

[Title]
[text TOC]
[image TOC]
[Site Search]
 [Donation]
 |
Star |
 |
| Materials |
Tools |
4" x 4 1/2" x 1/2" basswood
Small screw-eye
12ö ribbon |
Stick glue
Pencil
Scroll saw
Carving knife
Sandpaper
Finish |
See the Wood Carving section for more instructions, hints and tips.
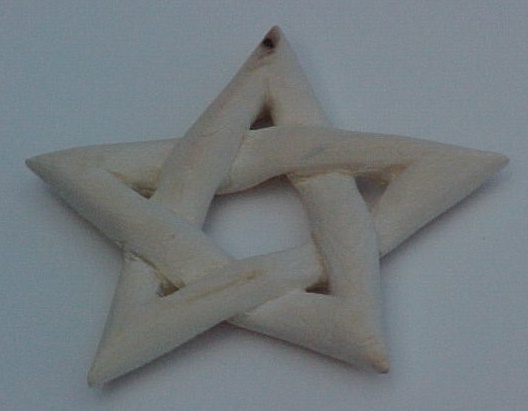
Copy the drawing and size it as needed. 4" tall is good for ornaments, 2 1/2" for neckerchief slides.
The arrows on the drawing indicate that those areas go beneath the parts that other segments.
To get a better idea of how overlapping segments look, make a model using clay or plastic tubing.

- Glue the drawing to the basswood using stick glue.
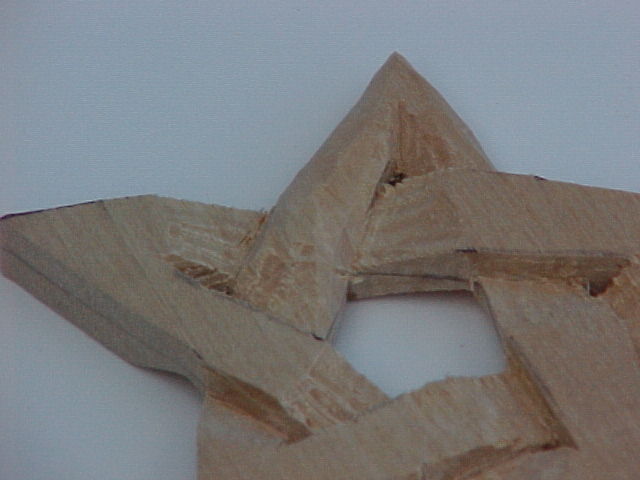
- Cut out the shape using a scroll saw. The center can be simply drilled out. Donĺt worry about the little triangle shapes on the inside of each point. Youĺll cut them out later with a knife.
- Layout the back the same as the front.
- Draw centerlines around the outside perimeter of the star to mark the middle of the thickness of the star.
- Using a carving knife, remove any extra wood in the center to form the pentagon.
- Draw centerlines around the inside of the star.
- Note that all the points are the same. Make stop cuts along the red lines. The segments between the stop cuts will be on top. The adjacent segments will go underneath.
- Remove wood to the stop cut forming a ramp. These are indicated by arrows on the drawing. Take the ramp almost to the centerline. The ramp should be short because in many cases the segment would have just crossed over another segment. This gives the impression that it goes underneath. You can use a knife, but a flat or slightly curved gouge makes it easier.
- Continue to form the ramps for all five points.
- Flip the star over. Now do the same on the back side.
- As you are working on the inside of each point, take the tip of your knife and insert it straight in along the three side of the small triangle. Repeat from the front side of the star. Continue until the triangle can be removed. The larger this triangle, the easier it is to shape and sand.
- When you have finished all the ramps on both sides, start rounding the sides of the segments. Undercut the places where the segments overlap for a more dramatic three-dimensional look.
- Make a small notch at the tip of each inside triangle.
- You can sand it if desired. Sanding is a challenge. You may spend more time sanding than carving! Use flat fingernail files for the outside edges and sandpaper glued to small dowel rods for the inner edges. Flexible sanding pads also come in handy.
- Finish with a clear sealer like Deft™ or paint with acrylic paint.
To attach a screw-eye, make a small V notch on the tip of one of the points. Screw it in and then tie a ribbon through it to complete your ornament.
To make a neckerchief slide, glue a PVC ring to the back with E-6000™.
Copyright © 2008 Vincent Hale