
[Title] [text TOC] [image TOC] [Site Search]
 [Donation]
[Donation]
[Donation]
| Candles |
|---|
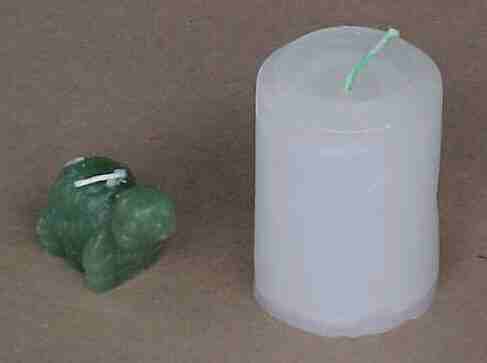 Molded |
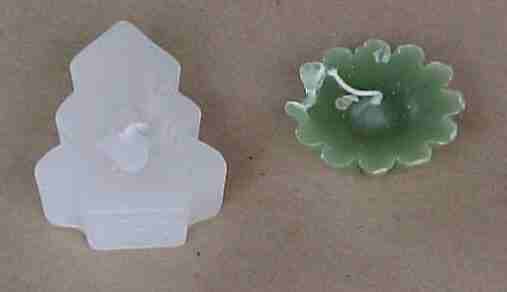 Floating |
Dipped |
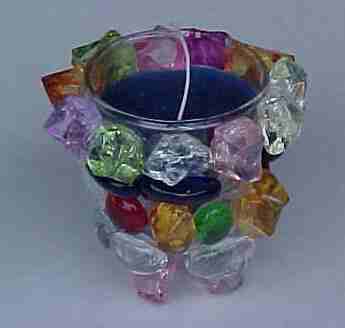 Container |
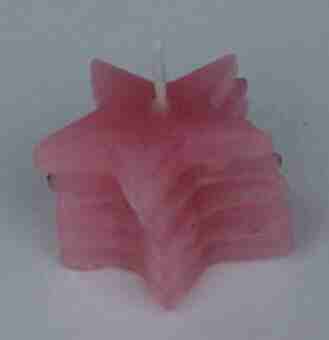 Stacked |
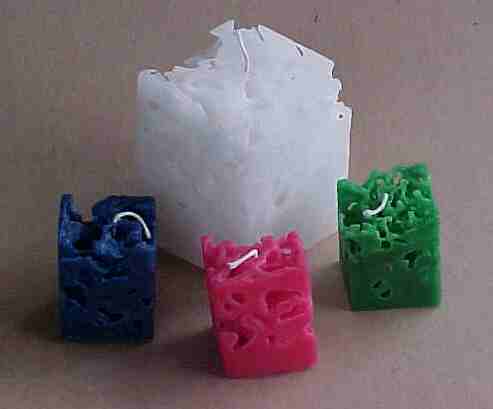 Ice |
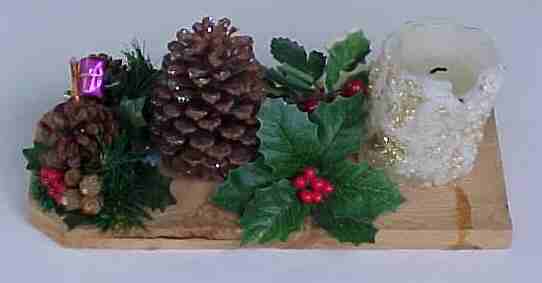 Christmas Centerpiece |
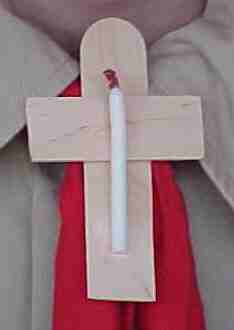 Cross with Candle |
There is something special about candles. They are used for special occasions like birthdays and parties. They are used for many religious activities, also. For Catholics, the candle is a symbol that Christ is the light of the world.
Candles are a great craft for children about 8 years old and up. Children enjoy making them because they look difficult, but are actually very easy once you know how to do it. Another great feature about candles is the variety of types you can make. There is your basic candle that is made in a mold, candles you make in a container, dipped and carved candles, floating candles, using sand as a mold, and many more. Then there are different effects you can use like different colors, scents, and layers. The possibilities are endless. Stop by a candle store or check out a book at the local library or craft store to get more ideas.
However, it can be dangerous because you are working with melted wax, which will cause severe burns. But with some extra supervision and caution you can turn this into a great activity.
Below is a list of equipment along with an explanation of how it is used. Also mixed in are hints that you will find make the task easier.
This can be a rather messy craft. Wax is liable to end up everywhere and it is difficult to remove. I did not want to use our kitchen stove for fear of the wife! Consider this when you plan the activity.
Stove - Use a Coleman™, propane stove, or electric heating pad. Two or more burners are best because you will need to be heating up more than one thing at a time. Because it takes a while to melt wax, you can stager the start times to minimize the delay. A lighter or matches will also come in handy to light the stove.
Double boiler - Wax is always heated in a double boiler. If wax is heated over direct flame, it can catch on fire. This is not only dangerous, but releases poisonous gasses. You could use a double boiler for this but since wax is difficult to remove from the pot, it's best to use an old pot (check out the local thrift store) or a large size vegetable or coffee can. Use smaller cans to hold the wax. Wax is lighter than water so the cans with wax will try to tip over. If the melting cans are very much smaller than the pot, place soft drink cans filled with water beside the cans of wax to act as spacers. You'll need one double boiler for each stove burner you use.
Melting cans - One-pound vegetable or soup cans work well for this. Remove the label. Squeeze the top rim to form a spout. Have several cans on hand especially if you are using different colors. If these cans are only slightly smaller than the double boiler (or can used for that purpose), then spacer cans are not necessary. Tall juice cans are good for hand dipped candles.
Spacers - Fill empty soft drink cans with water and place them in the double boiler to keep the cans of wax from tipping over.
Short wide cans - In addition to the tall cans used for melting wax, short cans come in handy for making foam. They should be at least 3 inches in diameter and 3" to 4" tall. You could also use tall cans and cut them off with a hacksaw.
Aluminum pan - Pans come in handy for keeping wax contained. Place molds in a pan, then pour wax into the mold. If the mold leaks or you spill the wax, it won't run all over the table or floor, but stay in the pan. These can usually be found cheap in dollar stores.
Aluminum foil - Use foil to line the pans to make cleanup easier or fashion pans out of heavy foil.
Hot pad - A variety of old hot pads and leather gloves can be useful. You can pick up a hot can of wax with gloves, or set a can of hot wax on a hot pad. A piece of plywood does nicely as a hot pad.
Pliers - Use to pick up the hot cans of wax. Tongue and groove (straight jaw) pliers work best because it keeps your hand away from the heat.
Forks - Use to move the paraffin around in the cans as it melts, mix the hardener in, and make foam for putting on the outside of the candle. Always have some extra on hand. You could use plastic if you don't leave them in the wax for any period of time. Or stop by a thrift or dollar store and pick up a few at minimal cost. A long piece of coat hanger is handy to have, also. Heat will travel up the wire if it is left in something hot for very long.
Knife - Don't use your favorite knife for this because of the difficulty in cleaning it up. Use it to cut wicks and scrap off or cut wax. Pick one up at a thrift or dollar store.
Scissors - Use it to cut wicks.
Ice pick - Some candles like floaters are made without a wick. The wick is added later by melting or drilling a hole in the candle, inserting a wick, then adding a little melted wax to hold the wick in place. You can make one using a nail or a knitting needle fitted with a wooden handle. Drill a hole slightly smaller than the nail/needle into the top of a piece of wood, then tap the nail/needle into place.
Paper Towels and Newspaper - Lay newspapers down on the working surface so the wax doesn't stick to it. Paper towels can be used to oil molds and in cleanup.
Fire Extinguisher - Hopefully you won't have to use this to put out a fire, but keep it handy just in case. If the wax does catch on fire, first turn off the heat. Then you can try to smother the flame, but do NOT pour water on it. Since wax floats on water, pouring water on the wax won't do much good and may cause the wax and fire to spread. Baking soda can also be poured onto a flame to extinguish it - keep a box handy just in case.
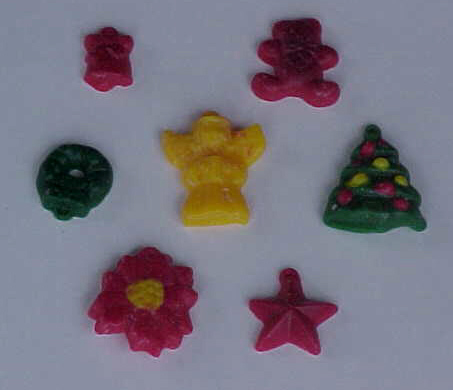
Molds - Plastic molds are available at craft stores. They come in several varieties. One-sided molds are like ice cube trays. These can be used for floating candles or make them thin to make decorations for larger round or square candles. Two sided molds are used for making 3-D figures. Use molder sealer (modeling clay also works) to plug holes around wicks and seams. Put a mold release on the inside before pouring the wax into the mold to make it easier to remove. Look around your house, there are many things you can use like jars, muffin tins, soft drink cans, cartons, juice cans, paper cups, candy molds, shells, ... Use masking or duct tape to reinforce molds that might not stand up to the melted wax.
Mold Release - A little vegetable oil can be used to lubricate the mold so the candle will come out easier. Cooking spray and silicone spray (available in home repair/hardware stores) works well also - just use a little. Do NOT use these on clear acrylic molds. After the candle is made, if you are having trouble getting it out of the mold, try putting it in the refrigerator for a few minutes.
Mold cleaner solution - This is one of those "must haves". It really makes cleanup so much easier. Use it to remove wax from stove, utensils, pot, ... Turpentine also works. Put a little on a paper towel and rub gently.
Wax - You'll sometimes hear wax referred to as paraffin. Purchase it in groceries (find it with canning products) or at craft stores. Slabs of wax (12"x24"x1") can be found at craft stores. The slabs have to be broken up (use a screw driver and hammer). Some craft stores may have granular or crystal wax. The crystals can be used as is or melted. Do NOT add any hardener or release agent. Small cubes of wax in different colors are sometimes available. They can be melted into plain wax to give it color.
Wick - Look for wicks in craft stores. There are different size wicks for different diameter candles. Be sure to use the right wick for the size candle you are making. Choose one too small and the flame will drown in the liquid wax. Choose one too large and it will smoke too much. Use square braided for molded, stacked, and dipped; metal core for container and floating. Prime wicks before using them. Metal clips are available to hold the wick in place for use in container candles.
Additives - There are several things that you might consider adding to your wax.
Sticks and tape - Use to hold the wick in place while the wax is hardening.
Prime Wick - Cut the wick several inches longer than you will need. Hold one end in a pair of pliers and dip into wax for about ten seconds. Remove the wick from the wax and let it cool for a few seconds then grab the other end and pull it straight. Hold it for a few more seconds, and then dip it in cool water to harden it.
Speed up hardening/cooling - You can help a candle harden faster by placing the mold in a bucket of cool water. Remember that wax is lighter than water so to keep the mold from floating and tipping over keep the water level less than half the height of the wax or weigh the mold down. Another method is to place the candle in a refrigerator.
Wax Cubes - Can be made by lining a pan with aluminum foil. Pour wax into the pan. Allow the wax to harden some then cut into cubes with a knife. Allow the wax to harden before removing it from the pan.
Removing blemishes - Sometimes the sides of a candle will get marked. Here are some thing you can do to correct this:
Whipped Wax - It looks like whipped cream or maybe snow. To make it simply allow the wax to cool in a wide melting can. Using a fork, whip the wax until it starts to form clumps. Quickly remove these clumps and apply them to the surface.
Leftover Wax - If you have a little wax left over and don't know what to do with it you can make small floating candles or make small candles in candy molds. These can be applied to the sides of larger candles to decorate them or cover blemishes.
Another idea is to make fire starters. Take one of the egg cartons that is made of pressed paper. Fill each of the depressions with dryer lint. Pour melted wax over the top. This keeps the dryer lint in place. When you are ready to use them, simply tear one off, place it beneath your tinder, and light a corner of the egg carton. The wax makes it burn much longer so it will get the fire going better.
Clean up - Metal items can be placed upside down in an aluminum pan lined with aluminum foil. Place in an oven on low heat (200 degree) for a few minutes. Use mold cleaner solution to clean anything that can't be put in the oven. If you get wax on the carpet or clothing, scrap off as much as you can. Then place a paper towel over the wax and use a warm iron on it.
If you need to fill some time while waiting for wax to cool, why not make a Cross with a Candle or a God's Eye.
References:
Basic Steps to Candles by Delorees Frantz